 PAFworks
Set up your organisation
Everything you set up for the whole organisation is in one place, the administration: your colleagues' accounts and what they may do, the groups and team shares they work in, your name and colours, the sign-in rules and the activity log.
What you need
- An account with the Administrator role. Only administrators see Admin in the left bar, and every step of this guide is theirs.
- To let people sign in with your own identity provider: an OpenID Connect provider (Keycloak, Authentik or another) where you can register an application.
Open the administration
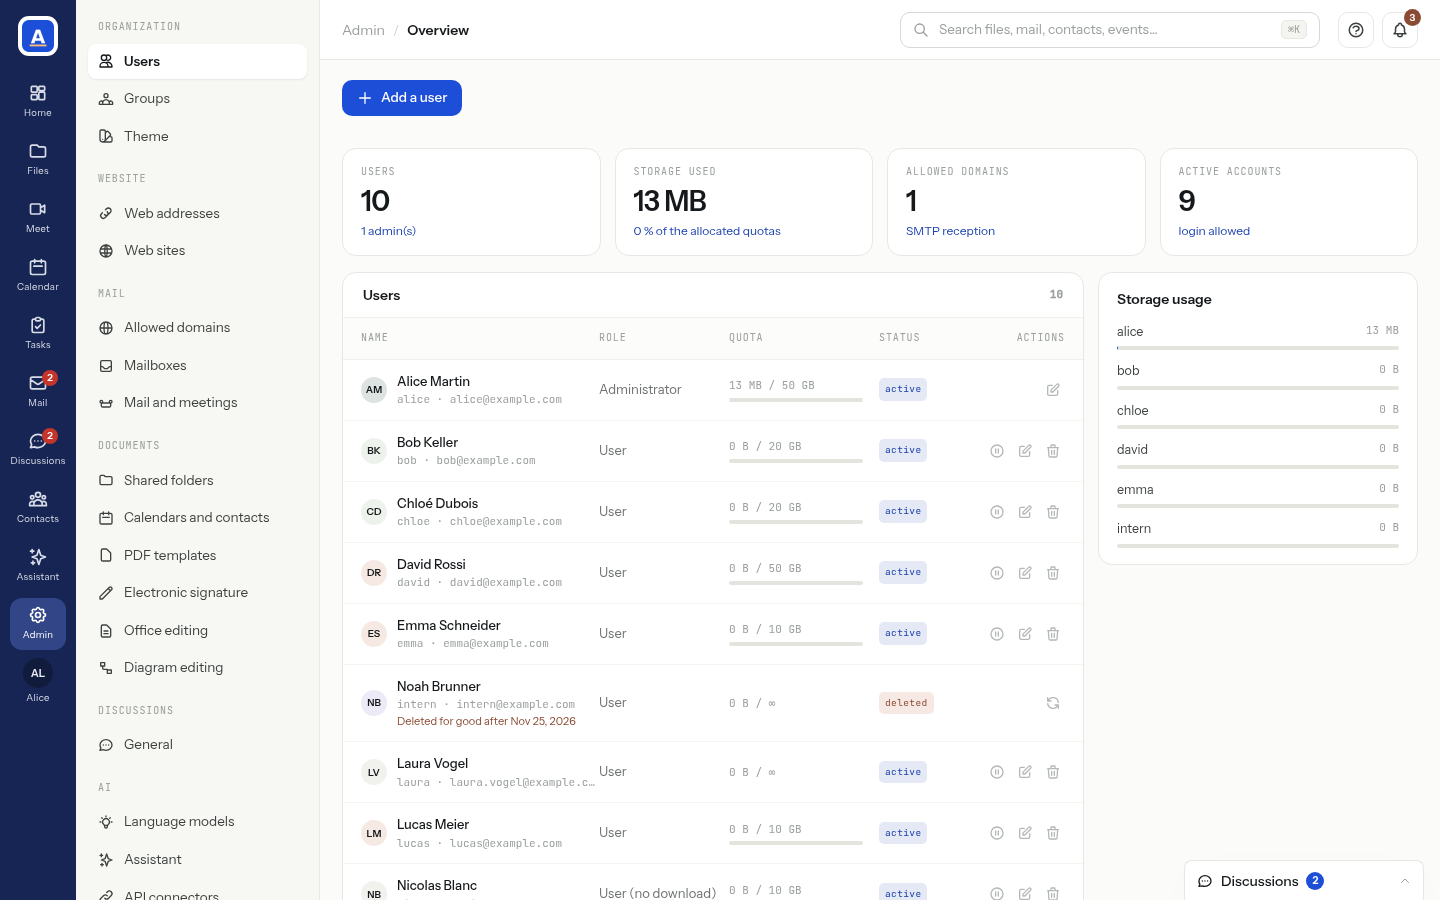
Click Admin at the bottom of the left bar. The administration opens on Users; the column next to it lists every section, grouped by subject.
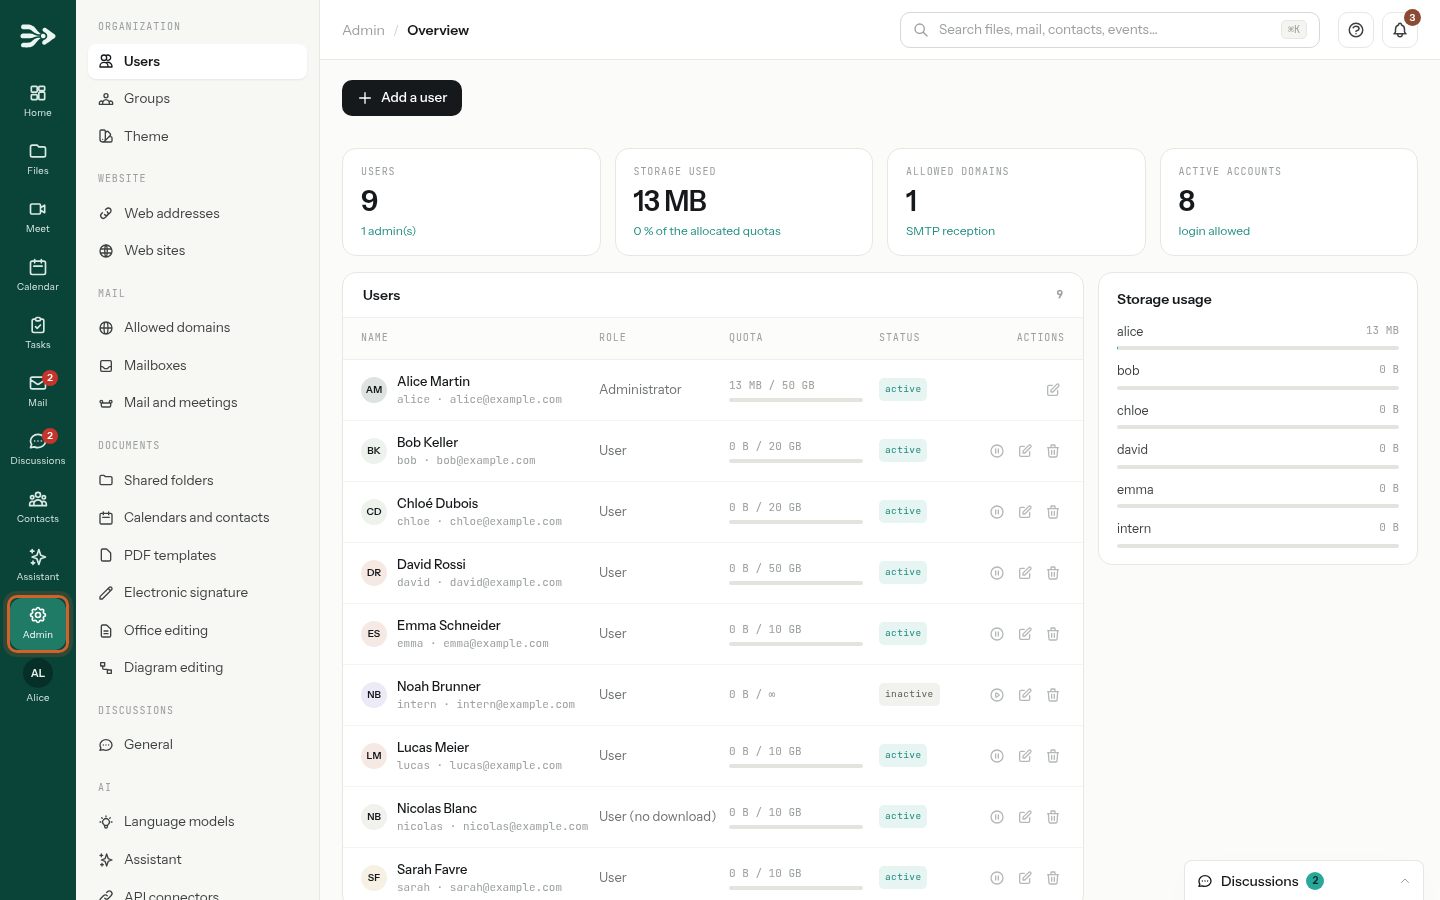
| Section | What you set there |
|---|---|
| Users, Groups, Theme | Accounts, groups and your brand: this guide. |
| Web addresses | The addresses your users type to reach PAFworks, such as your own domain name. |
| Web sites | Folders published as websites: see Create your website with PAFworks and Claude. |
| Allowed domains, Mailboxes | Your mail domains and addresses, shared mailboxes: see Use your own mail domain. |
| Mail and meetings | Outgoing mail, antispam and online meetings. |
| Shared folders, Calendars and contacts | Every team share, shared calendar and shared address book of the organisation: this guide. |
| PDF templates | The layouts people pick when they export a Markdown document to PDF. |
| Electronic signature | The certificates that seal signed documents: see Get a PDF signed. |
| Office editing, Diagram editing | The online editors of office documents and of diagrams. |
| General (Discussions) | The settings of Discussions: see Chat, call and meet. |
| Language models, Assistant, API connectors | The AI of your organisation: see Set up the assistant for your organisation. |
| Modules | When your PAFworks offers them, your own small applications: see Build your own module with Claude. |
| Security, SSO configuration | Two-factor authentication, lockouts, identity providers: this guide. |
| Workstations | The Linux computers that sign in with PAFworks accounts. |
Add a user
-
In Users, click Add a user.
-
Fill in the New user window. The Username is what the person signs in with: lowercase letters, digits and
. _ - + @only, with no space. It cannot be changed later. Choose a first Password and a Role (see below).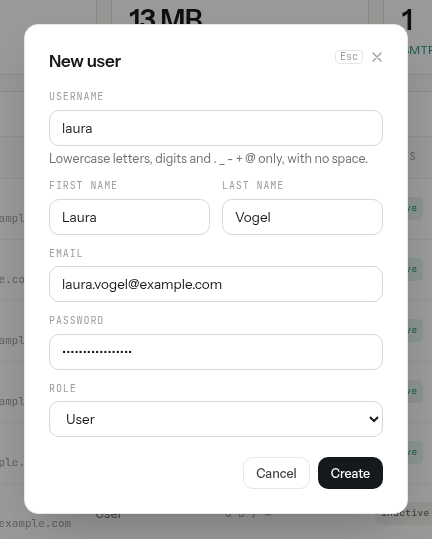
-
Click Create. The account appears in the list. PAFworks sends no invitation: give the person their username and password yourself. They can change the password on the Security page of their account.
An e-mail address on one of your mail domains also becomes the person's mail address in PAFworks as soon as the account is created. An address on any other domain is simply recorded on the account.
If your organisation signs in through its own identity provider, accounts can also be created at the first sign-in: see Sign in with your identity provider.
Choose the role and the storage quota
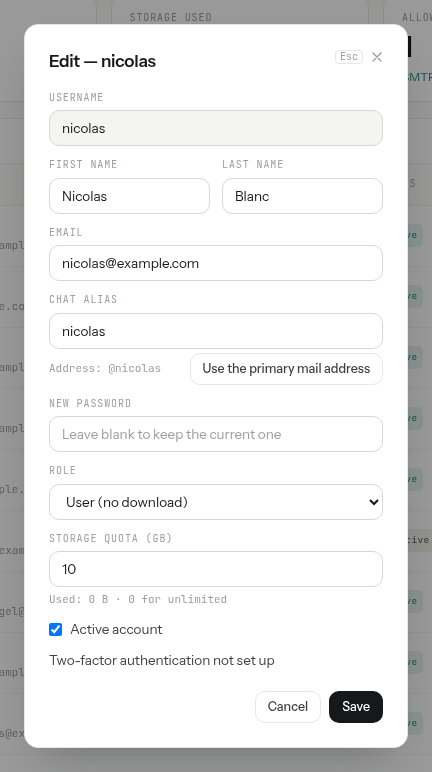
Click the pencil (Edit user) at the end of a row. Besides the name and the e-mail address, the window holds the role, the storage quota, a New password field for someone who forgot theirs, the Active account box, and Reset for a person who lost the phone of their two-factor authentication.
| Role | What the person can do |
|---|---|
| User | Everything in PAFworks except the administration. |
| User (no download) | Works in the web interface like a user, but can never take a copy of a file out: no download, no desktop or mobile sync, no app passwords (so no mail app and no AI app), no share links, no mail attachments, sent or received. The share links the account made before stop working while it has this role. |
| Administrator | Everything, including the administration. |
Storage quota (GB) sets the space the person is given; 0 means unlimited. The list shows what each account uses against it: their own files, with their previous versions and what is in their trash, and their mail with its attachments; files in team shares count against nobody. Only the files are held to the quota: once they reach it, new uploads are refused, but mail keeps arriving.
Storage used, at the top, is everything the organisation stores: the accounts' files, the team shares, the mail with its attachments. Storage usage on the right splits it, largest first: each account with its files and its mail, then the team shares, the shared mailboxes and the rest.
Pause, delete or restore an account
Next to the pencil, two buttons act on the whole account:
- Pause (Pause account): after a confirmation, the person can no longer sign in anywhere — web, sync clients, mail apps, AI apps — and their share links, workspaces and booking pages stop answering. Nothing is deleted: Resume account brings everything back.
- Delete (Delete user): the account is disabled right away, and deleted for good with its files and mail 30 days later.
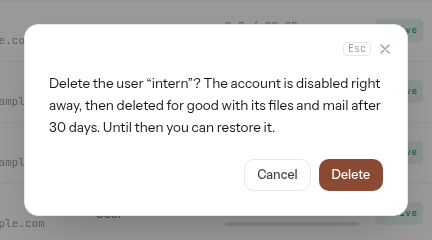
Until then, a deleted account stays in the list with the date it goes for good. Click Restore user on its row to give it back as it was, active or paused, with everything it held.
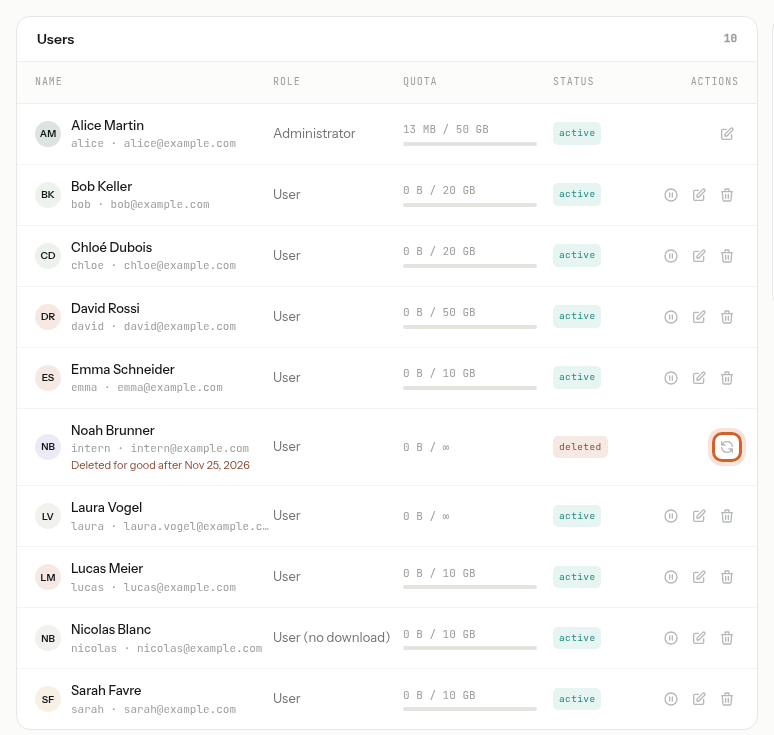
Your own account can be neither paused nor deleted from here: another administrator has to do it.
Groups
A group gathers accounts so that you can give access to all of them in one move. Click Groups in the administration.
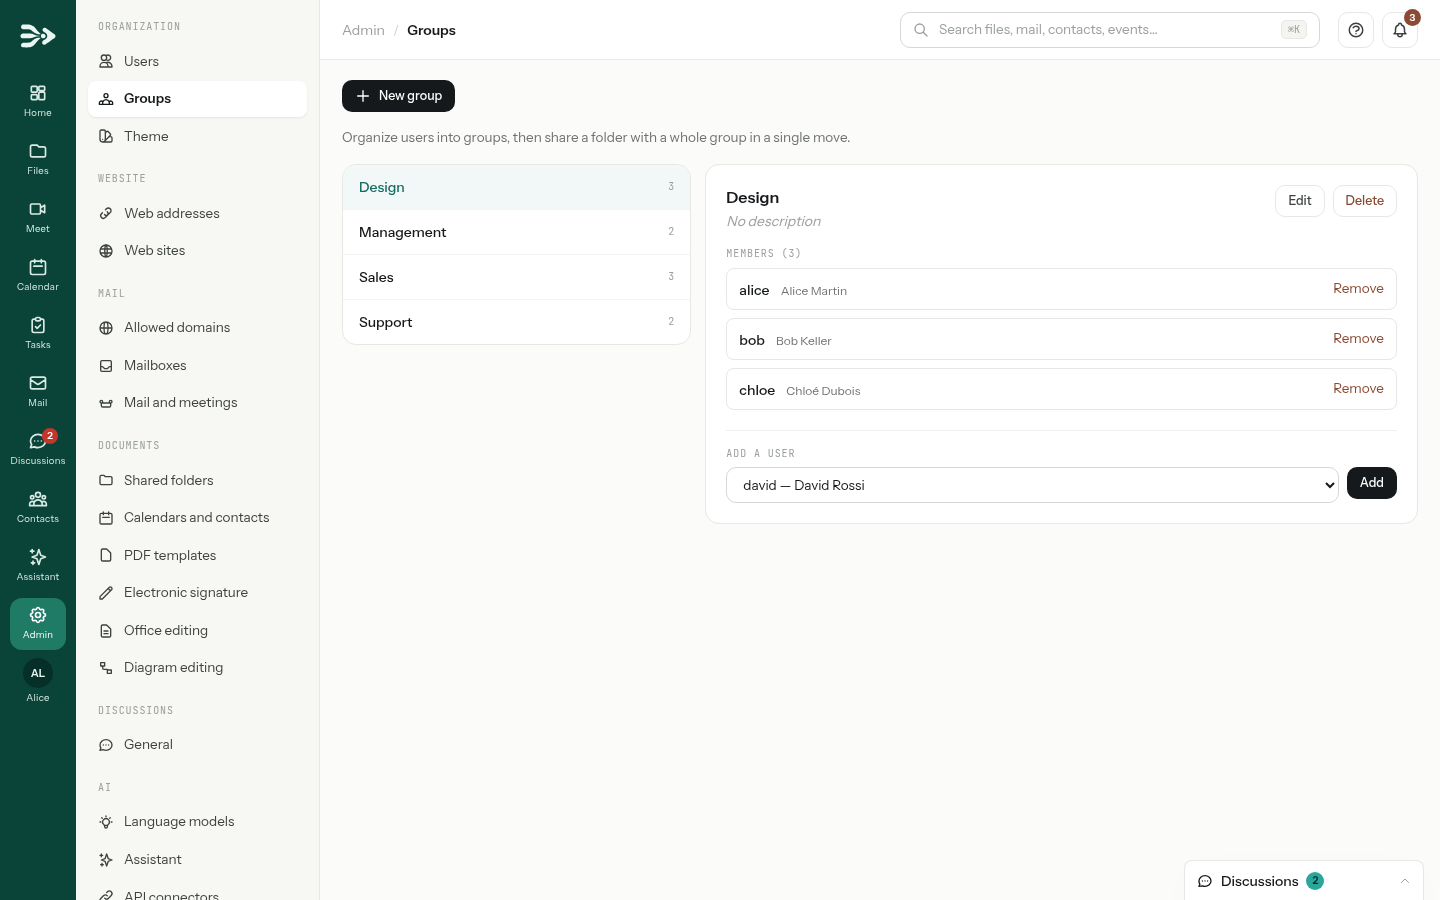
- New group asks for a Name and an optional Description.
- Select a group to see its members. Pick an account under Add a user and click Add; Remove takes someone out.
- Edit renames the group. Delete removes it, and with it the access to the folders it was granted.
Groups are used when you give access to a team share (next section). People can also pick a group when they start a group discussion or invite people to a date poll.
Team shares
A team share is a folder that belongs to the team, not to one person: all its members find the same files in it, each according to their rights. Only administrators create them.
-
Create the share
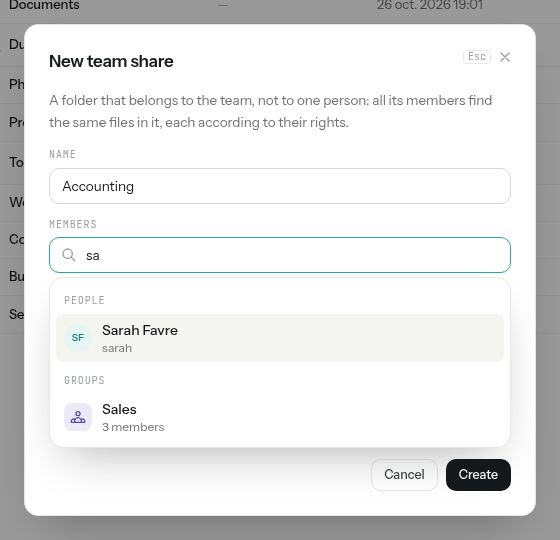
In Files, click the + next to Team share in the left column. Give the share a Name.
-
Add people and groups
In Members, type part of a name: people and groups are found in the same search. Pick each one in the list.
-
Set their rights, then create
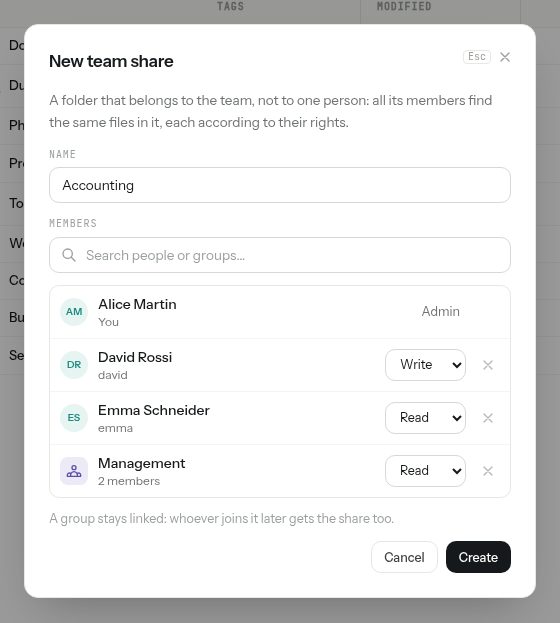
Everyone you add starts with Write; change it to Read or Admin where needed. You are listed first, as Admin. Click Create: the share appears under Team share in the Files of every member.
| Right | What the member can do |
|---|---|
| Read (Read only in the administration) | See and open the files. |
| Write (Read & Write) | Also add, change, move and delete files. |
| Admin | Also rename the share, change its members and delete it, with the gear (Share members) shown next to the share in Files. |
A group stays linked: whoever joins the group later gets the share too, and whoever leaves it loses it. Someone who has a right of their own and another through a group gets the higher of the two.
Manage every team share
In the administration, Shared folders lists every team share of the organisation, including those you are not a member of. Click Manage to rename a share, add or remove people (Add a user…) and groups (Add a group…), and change their rights. You can also create a share here, then add its members.
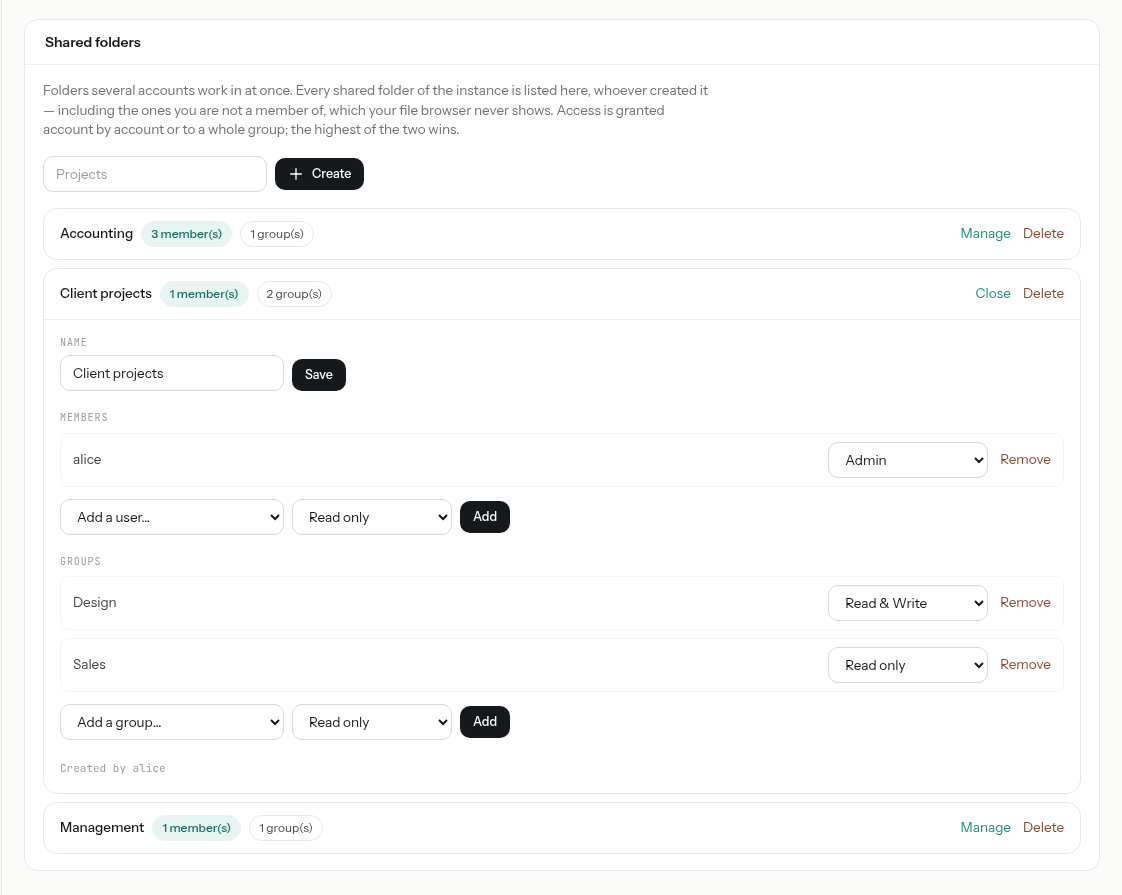
Delete and restore a team share
Click Delete on its row and confirm. The share disappears right away for all its members, then is deleted for good with everything filed in it 30 days later. Until then it stays in the list, where Restore brings it back as it was, members and groups included.
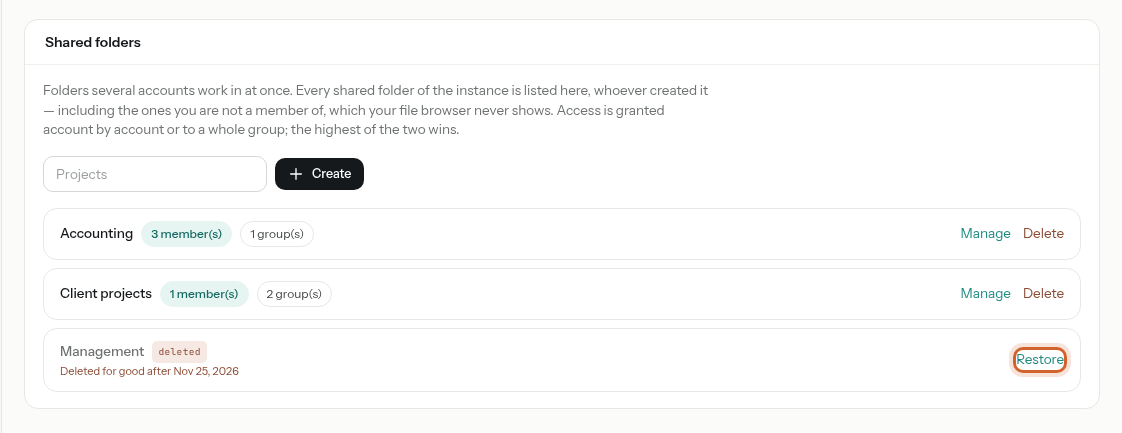
A share's own administrators can delete it from its gear in Files too; restoring it is always done here.
Shared calendars and address books
Calendars and contacts does for calendars and address books what Shared folders does for files. It lists every shared calendar and every shared address book of the organisation, whoever owns it. The task lists of Tasks are calendars too, so they are here as well.
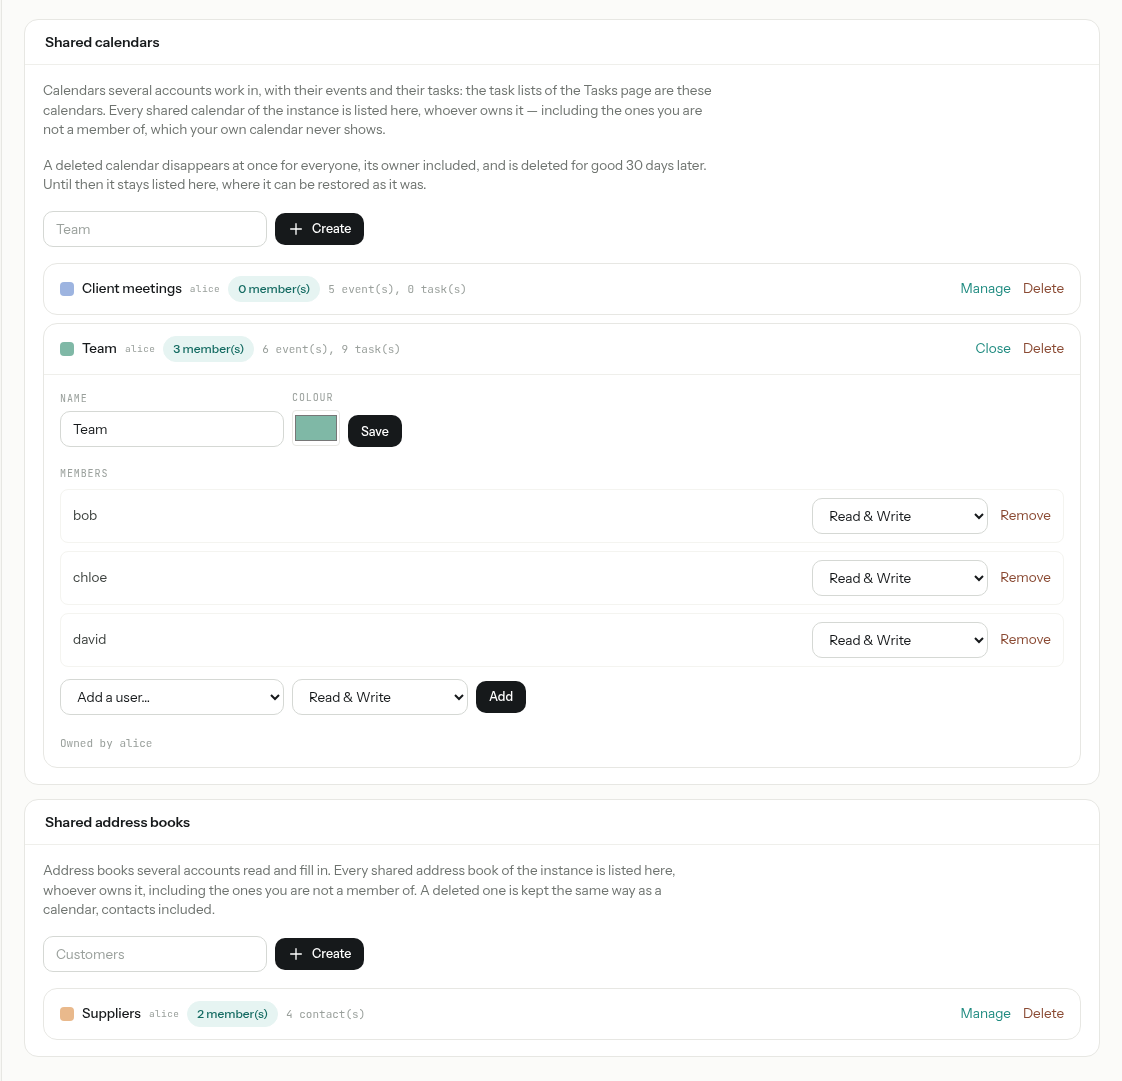
- Type a name and click Create to make a new one; you are its owner.
- Manage changes its Name and Colour, and its members: pick someone under Add a user… with Read only or Read & Write.
- Delete takes it away at once from everyone, its owner included, with its events and tasks or its contacts. Restore brings it back during the next 30 days.
Your brand: name, logo and colours
In the administration, click Theme. The preview at the top changes as you type.
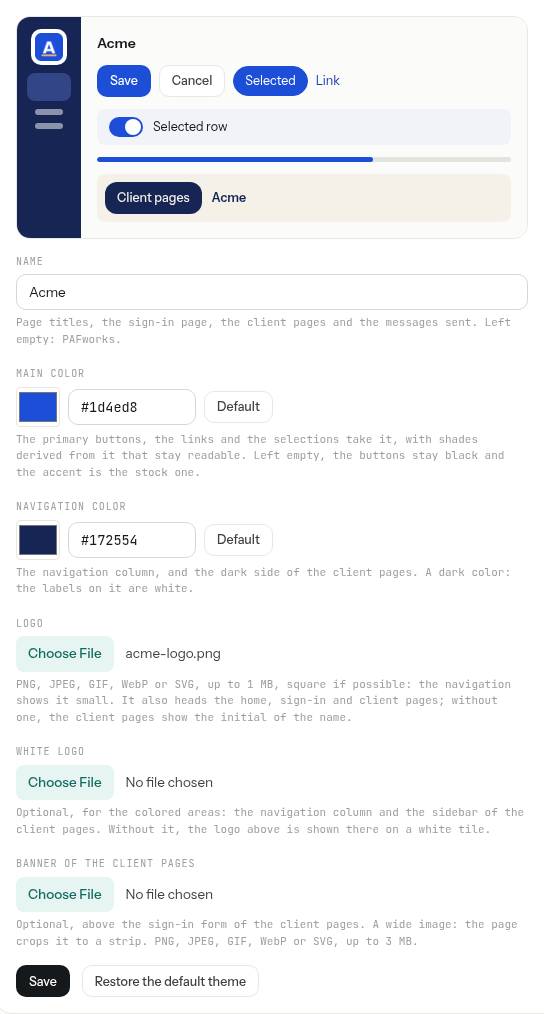
| Field | What it changes |
|---|---|
| Name | Page titles, the sign-in page, the client pages and the messages sent. Left empty: PAFworks. |
| Main color | The primary buttons, the links and the selections, with readable shades derived from it. |
| Navigation color | The navigation column, and the dark side of the client pages. Choose a dark colour: the labels on it are white, and a colour too light for them is refused. |
| Logo | PNG, JPEG, GIF, WebP or SVG, up to 1 MB, square if possible. It also heads the home, sign-in and client pages. |
| White logo | Optional, for the coloured areas. Without it, the logo is shown there on a white tile. |
| Banner of the client pages | Optional: a wide image above the sign-in form of the client pages, up to 3 MB. |
Click Save: the page reloads in your colours. Restore the default theme goes back to the PAFworks name, logo and colours.
- In the application, for everyone in your organisation: the logo and the navigation colour in the left bar, the main colour on buttons, links and selections.
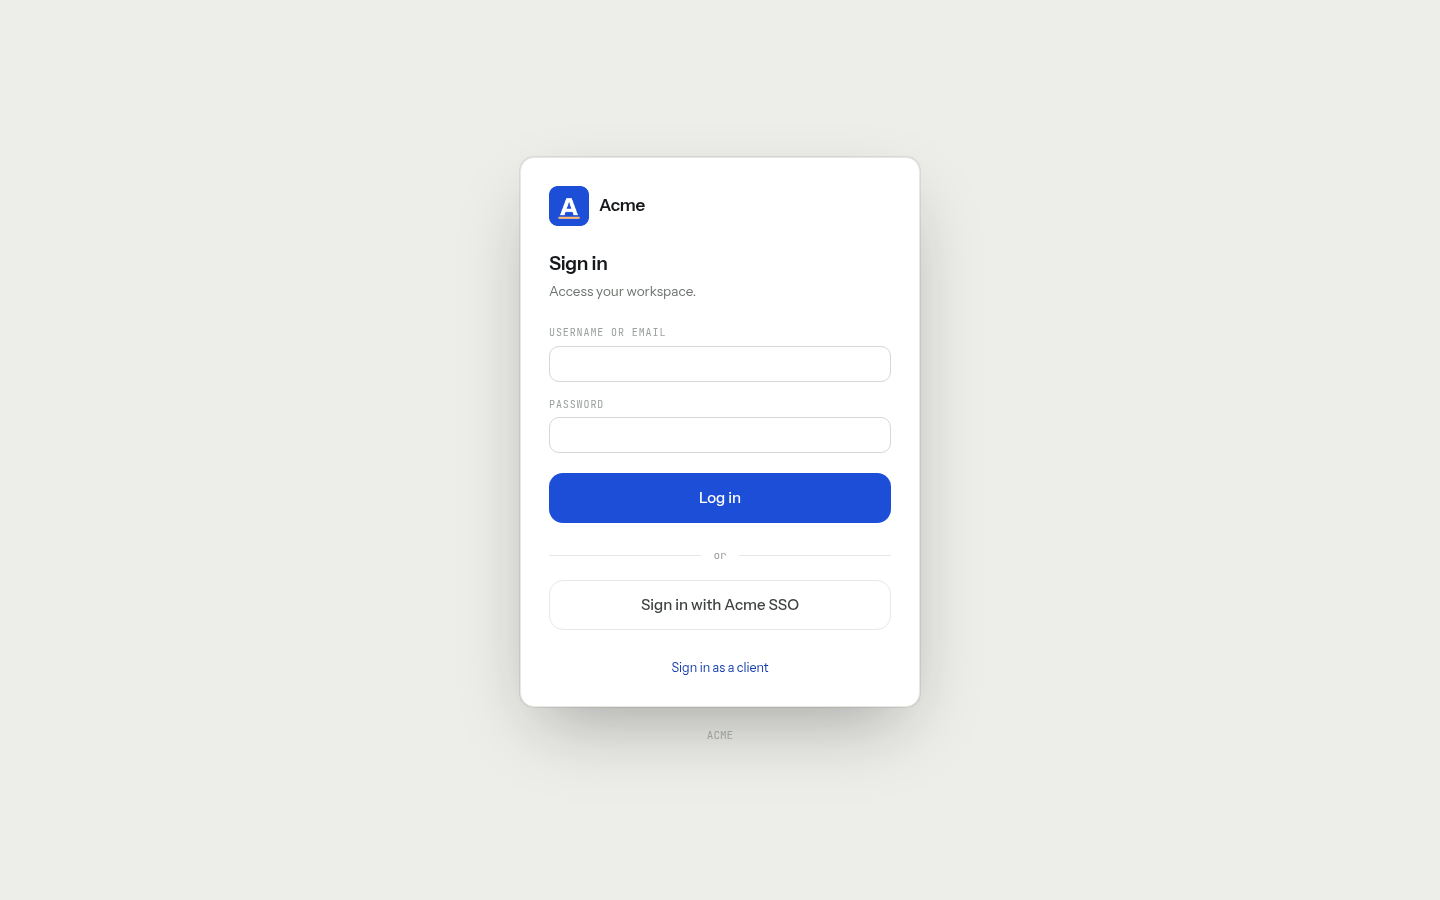
- On the sign-in page and the pages of public links: the logo and the name head the page.
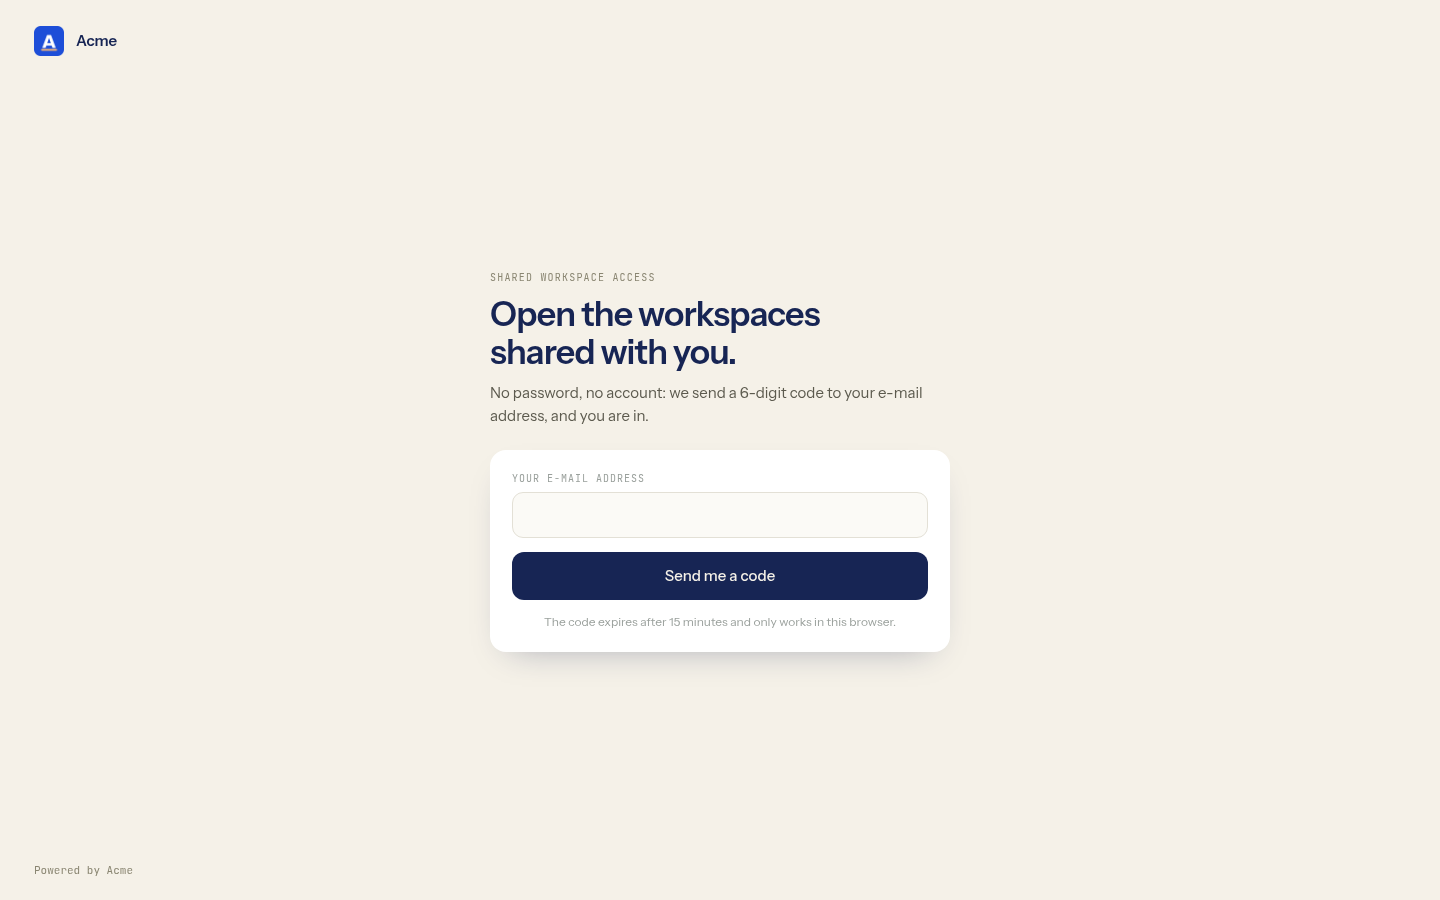
- On the client pages, where the guests of your workspaces ask for their code and open their files.
- In e-mails: notifications and invitations carry the name, and their links take the main colour.
Dress a client in their own colours. An organisation in your contacts can have a theme of its own, set in the Client space section of its card in Contacts: its people then see it on their client pages instead of yours.
Sign-in security
In the administration, click Security. The Sign-in policy panel holds two rules; click Save after changing them.
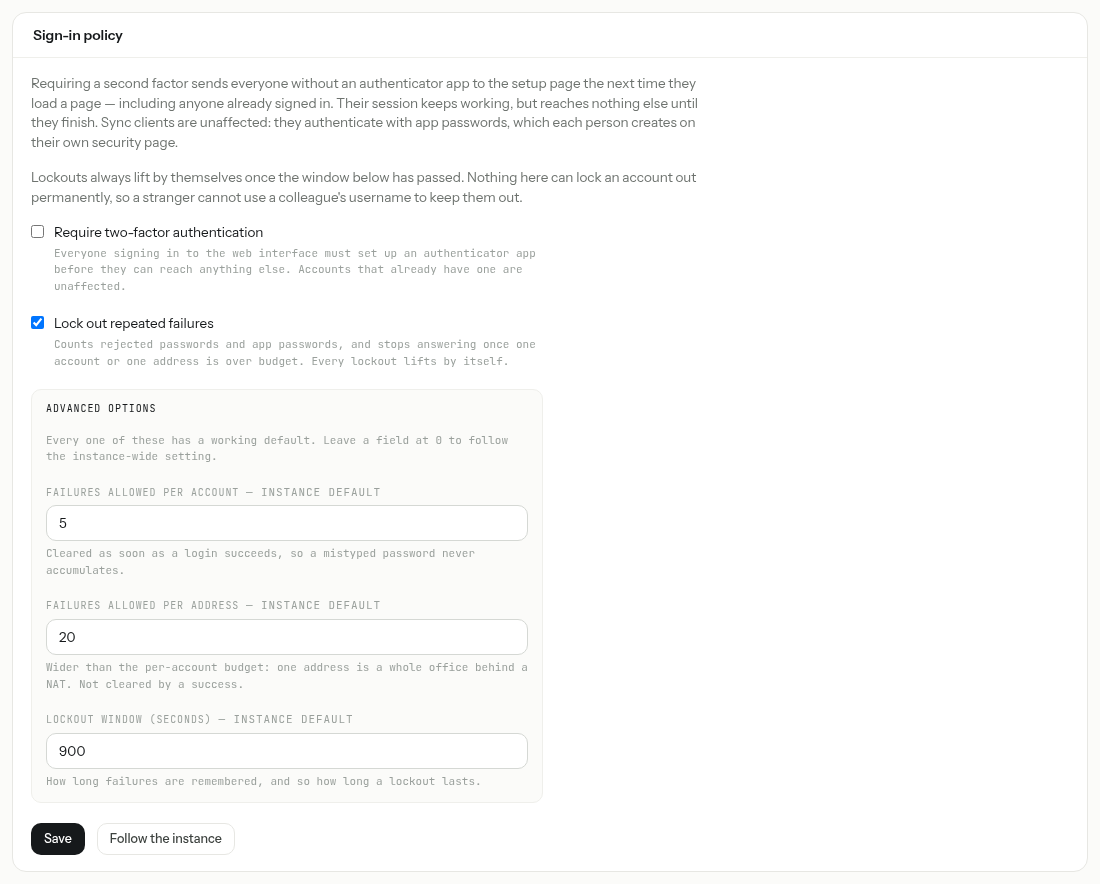
- Require two-factor authentication: everyone signing in to the web interface must set up an authenticator app before they can reach anything else, people already signed in included. They see a Set up two-step verification page: they scan a QR code with an app such as Aegis, FreeOTP or Google Authenticator, type the 6-digit code, and keep the recovery codes shown. Accounts that already have an app are unaffected.
- Lock out repeated failures (ticked by default): wrong passwords and app passwords are counted, and sign-ins are refused for a while once an account or an address has had too many. By default: 5 failures per account, 20 per address, remembered for 900 seconds (15 minutes). Advanced options changes these figures.
Sync clients, mail apps and AI apps sign in with app passwords, which each person creates in their preferences: they keep working when you require two-factor authentication. Follow the instance drops your values and goes back to the defaults of your PAFworks.
Lockouts always lift by themselves once the time has passed: nobody can keep a colleague out by typing wrong passwords under their name. A successful sign-in clears the count of the account.
Sign in with your identity provider
If your organisation already has an OpenID Connect identity provider — Keycloak, Authentik or another — people can sign in to PAFworks through it, with no second password.
In the administration, click SSO configuration, then New provider.
-
At your provider, register PAFworks as an OpenID Connect client with the Redirect URI and the Post-logout redirect URI shown at the top of the page. Then fill in the form: a Provider ID (letters, digits, hyphens and underscores: it is part of the redirect URI), the Name shown on the sign-in button, the Server URL of the provider, and the Client ID and Secret key it gave you.
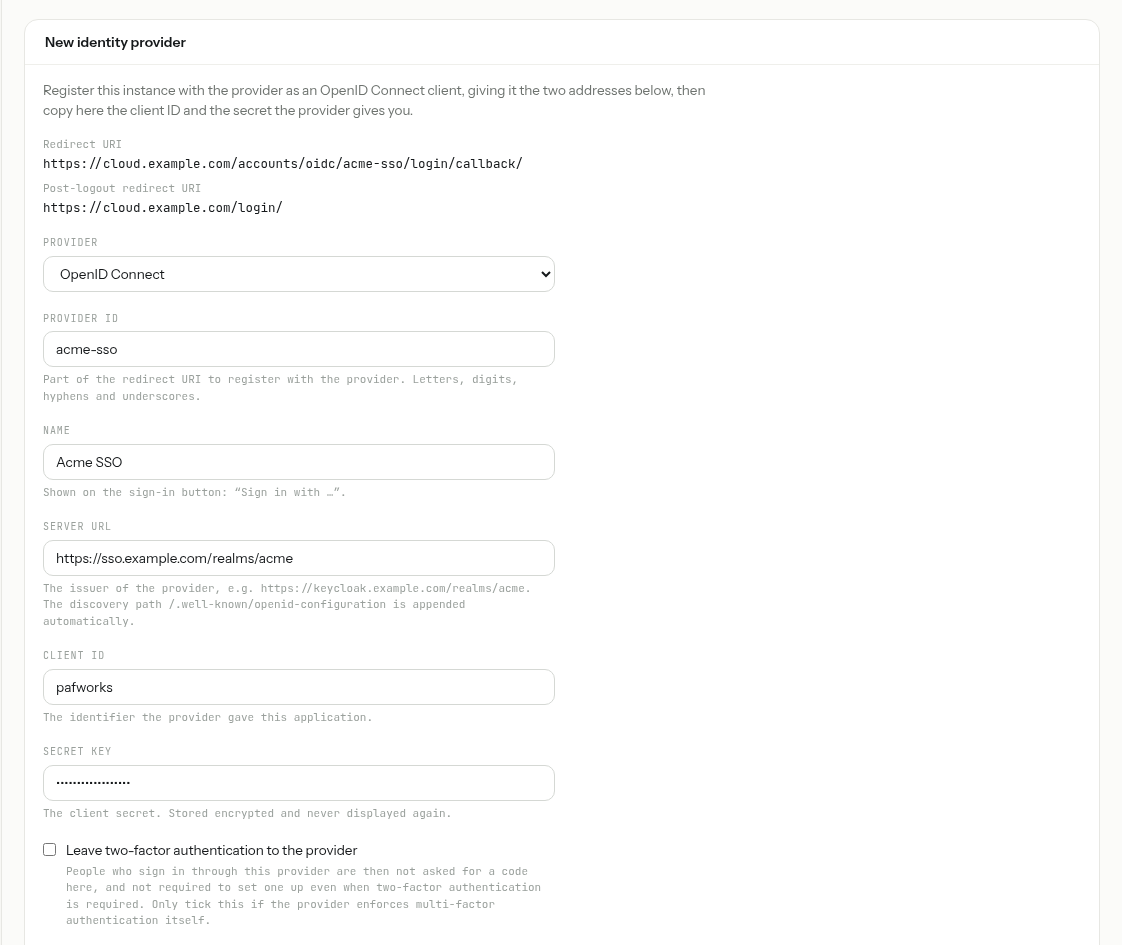
Tick Leave two-factor authentication to the provider only if your provider already enforces it: people signing in through it are then not asked for a code by PAFworks. Click Create.
The sign-in page now shows a Sign in with Acme SSO button (see the picture in Your brand), and usernames and passwords keep working alongside. PAFworks recognises an existing account by the e-mail address the provider has verified, or by the username; someone the provider knows who has no account yet normally gets one at their first sign-in.
- Once a provider exists, a Sign-in page panel offers Hide password sign-in: the sign-in page then only shows the providers' buttons, and sends people straight to the provider when there is only one. The password form stays one address away, given in the panel:
https://cloud.example.com/login/?show-password-login. - Disable this provider, in its form, takes its button off the sign-in page and keeps its settings. Delete removes it: people who only ever signed in through it will need a password.
- An account created through the provider has no password of its own: its owner creates app passwords for their devices in their preferences.
PAFworks as the identity provider of your other applications
The other way round: your wiki, dashboard or ticket tracker can sign people in with their PAFworks account.
In Security, under Identity provider, tick Enabled and click Save. Give the application the addresses listed below the box, starting with the Discovery document.
Under Connected applications, type the application's name, choose Server-side application or Browser or mobile application, type its redirect address (one per line, matched exactly) and click Register.
-
Copy the client identifier and the secret into the application. The secret is shown only once; Renew the secret makes a new one, and Remove disconnects the application.
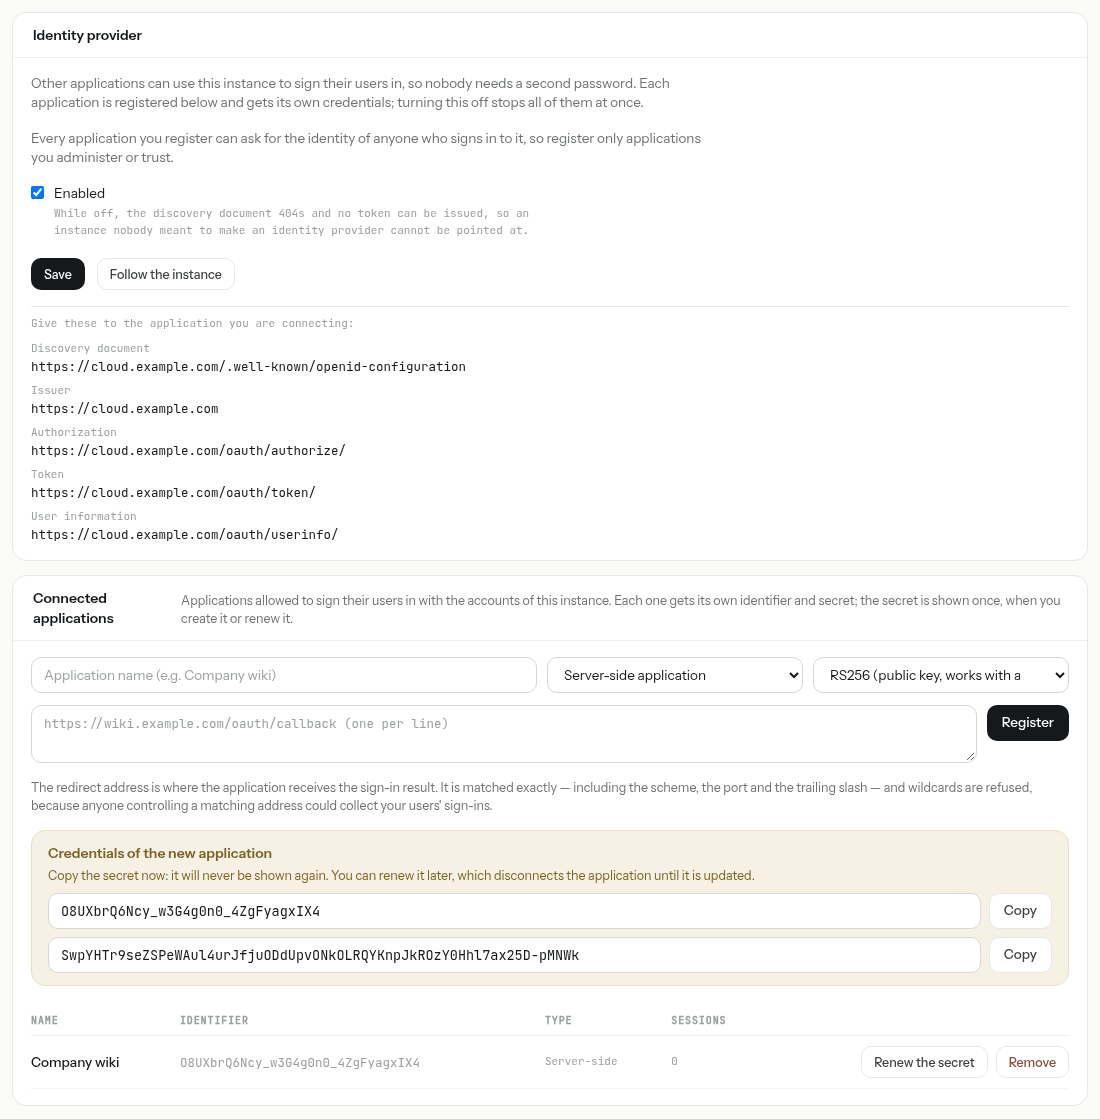
The first time someone signs in to the application, PAFworks asks them to Allow it. They can withdraw it later in their preferences, under Devices and sync › Applications you signed in to.
Register only applications you administer or trust. Each of them can ask for the identity of anyone who signs in to it. Unticking Enabled stops all of them at once.
The activity log
Open https://cloud.example.com/activity/. Everyone sees their own activity there; as an administrator, click All to see the whole organisation's.
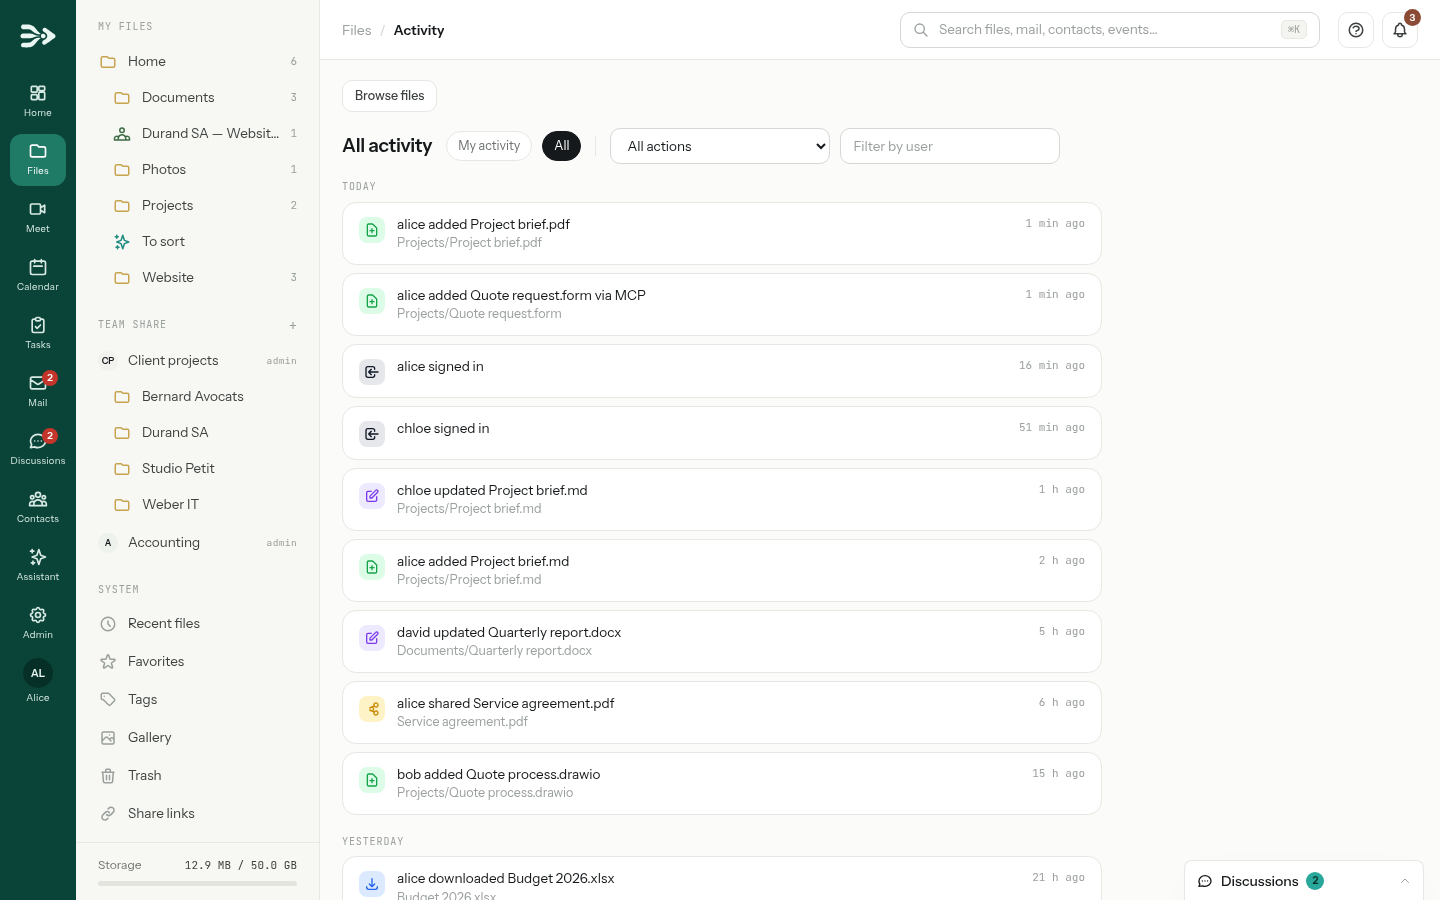
- All actions narrows the list to one kind: files added, edited, opened or downloaded, deletions, moves, renames, folders created, shares and their visits, versions restored, sign-ins.
- Filter by user takes a username. Load more goes further back.
- The Activity section of a file's details panel, in Files, shows the same history for that file alone.
Good to know
- One delay for everything you delete here: accounts, team shares, shared calendars and address books are kept for 30 days, then deleted for good in the night after the date shown. They can be restored until then.
- A deleted account keeps its username and e-mail address until it is deleted for good: they cannot be given to a new account meanwhile. The same goes for the name of a deleted team share.
- When an account goes for good, what it had put in team shares stays in them.
- A shared calendar or address book belongs to its owner: if the owner's account is deleted, it goes with it, whoever its members are. The administration warns you when the owner's account is disabled.
- Pausing an account or giving it the User (no download) role switches its share links off without deleting them: they work again once you resume the account or change the role back.
- Two-factor authentication applies to the web interface; devices and apps use app passwords, which each person can revoke on their own.
- Signing in to another application through PAFworks gives it the person's identity — name, e-mail address, and their groups if it asks — never their files or mail.
- The activity log keeps one year of history.