 PAFworks
Use your own mail domain
Have your organisation’s mail arrive in PAFworks and leave from it under your own domain name. Add the domain, publish the DNS records PAFworks lists for it, then give everyone their address — and add shared mailboxes, distribution lists and a scan-to-mail address where you need them.
What you need
- A PAFworks administrator account: Admin appears in the left bar. Everything on this page is done there.
- A domain name, such as
acme.example, and access to its DNS settings at your registrar or DNS host. - The accounts of your colleagues, created in Admin › Users: see Set up your organisation.
Step 1 — Add the domain
-
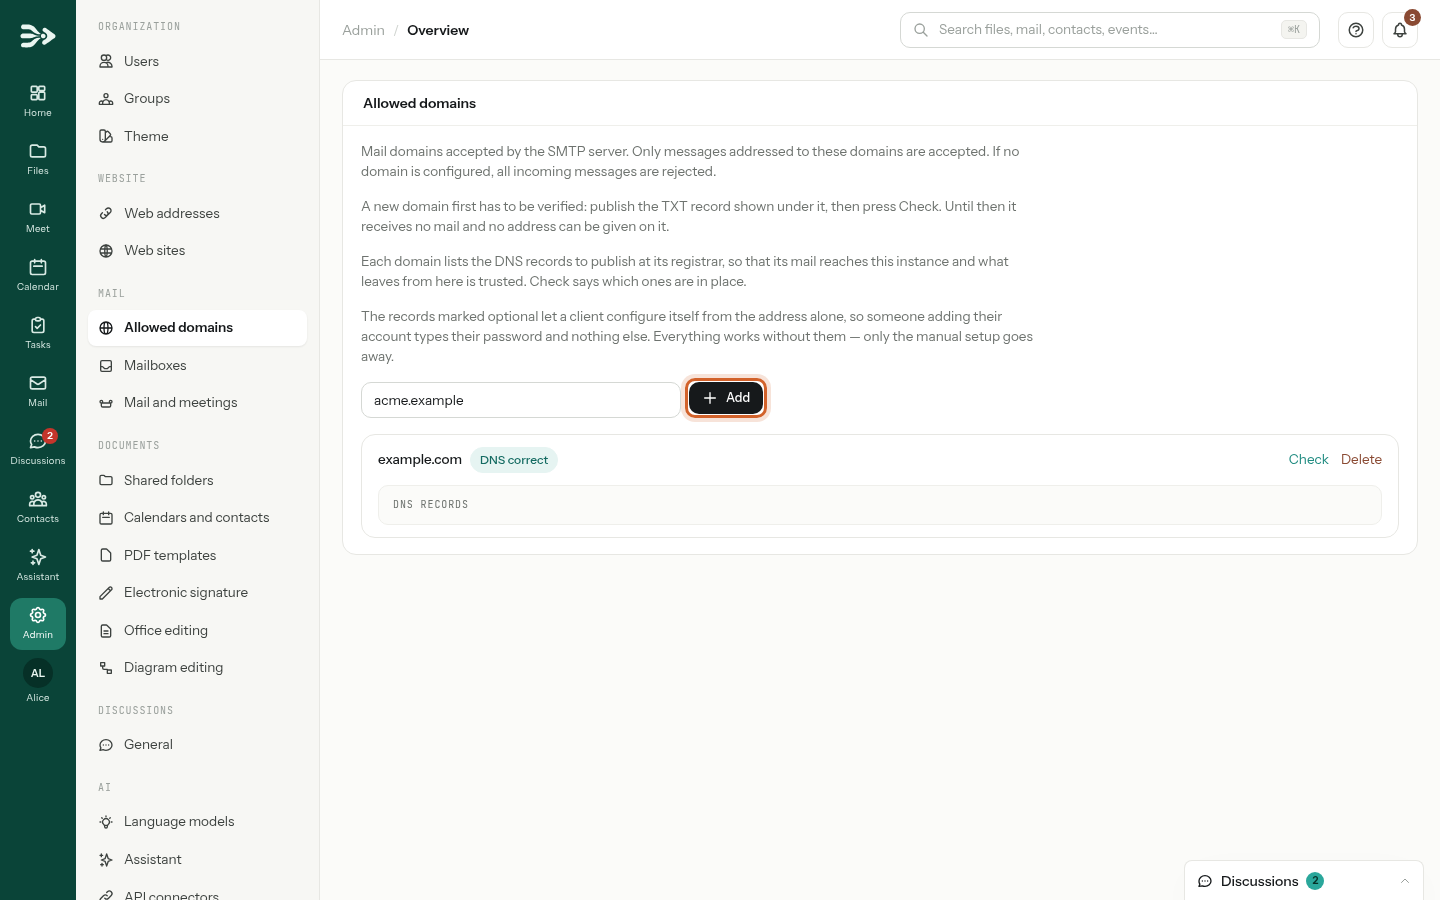
Click Admin in the left bar, then Allowed domains under Mail. Type your domain and click Add.
-
The domain appears as Not verified, followed by its DNS records: the list of what to publish, with the type, the name and the value of each record, and a line on what it is for.
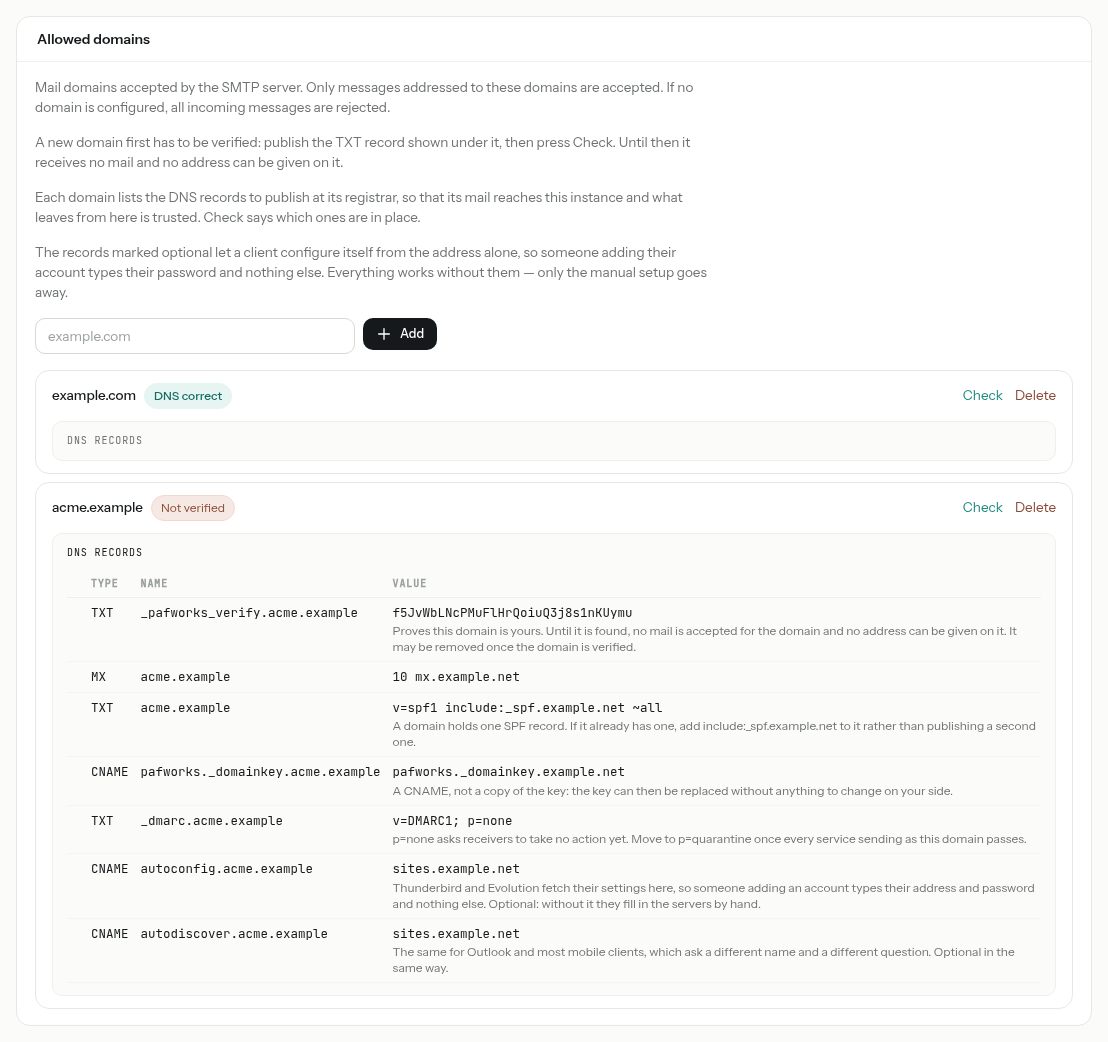
Until the domain is verified, it receives no mail and no address can be given on it. Publish at least the first record of the list straight away.
Step 2 — Publish the DNS records
At your registrar or DNS host, create each record exactly as PAFworks lists it: same type, same name, same value. The values are those of your PAFworks service — copy them from your page; the picture above shows examples. In the order of the list:
| Record | What it does |
|---|---|
Proof of ownershipTXT | Its name starts with _pafworks_verify, its value is a token of this domain’s own. Proves that the domain is yours. It may be removed once the domain is verified. |
Incoming mailMX | Brings the domain’s mail to PAFworks. If the domain has other MX records, remove them: a sender may pick any of them. |
SPFTXT | Tells the servers receiving your messages that PAFworks may send as your domain. A domain holds one SPF record: if yours already has one, add the include: part of the value to it rather than publishing a second one. |
DKIMCNAME | Lets them check the signature PAFworks adds to your messages. A CNAME, not a copy of the key: the key can be replaced without anything to change on your side. |
DMARCTXT | Tells them what to do with a message failing the two checks above. p=none asks for no action yet; move to p=quarantine once every service sending as your domain passes. |
autoconfigCNAME | Optional. Thunderbird and Evolution fetch their settings here: whoever adds their address types it and their password, nothing else. |
autodiscoverCNAME | Optional. The same settings, for mail apps that use Microsoft’s Autodiscover. |
The name field of your DNS host. Many DNS hosts add your domain to the name by themselves: there, type only what comes before it — _dmarc rather than _dmarc.acme.example.
Outlook. Do not count on the autodiscover record to set up Outlook: for an IMAP account, Outlook asks Microsoft’s own service rather than your domain, and may still ask for the server settings. Your colleagues find them in PAFworks under Help › Get your mail in your mail app — see Mail, calendar and contacts.
Depending on your PAFworks service, the list may hold other optional records, such as SRV and TXT records under _caldavs._tcp and _carddavs._tcp: they let calendar and contacts apps find PAFworks from an address alone.
Step 3 — Check the records
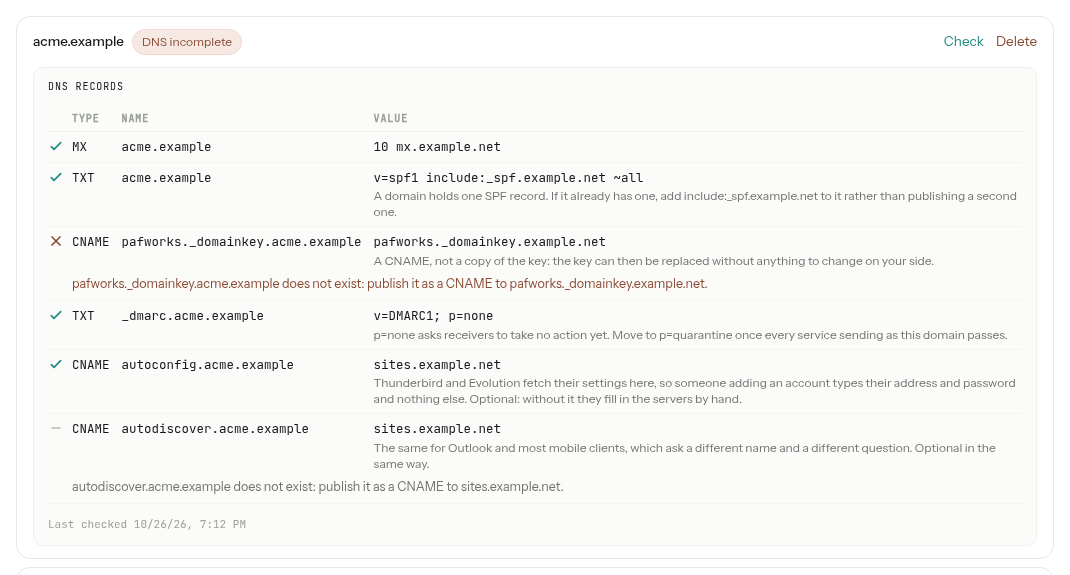
Once the records are published, click Check on the domain. PAFworks asks your domain’s own name servers rather than a cache, so a record is seen as soon as your DNS host publishes it. Each record then gets a mark, and the domain a status.
| Status | Meaning |
|---|---|
| Not verified | The record proving the domain is yours has not been found yet. The domain receives no mail. |
| Not checked | The domain is verified; its other records have not been checked yet. |
| DNS correct | Every required record is in place. The list folds away: click DNS records to see it again. |
| DNS incomplete | A required record is missing or wrong: the line under it says what to fix. |
- A tick means in place, a cross to fix. A dash marks an optional record that is not there: it does not make the domain incomplete.
- The last line says when the domain was last checked. Click Check again after each correction.
- You do not have to come back for the proof of ownership: PAFworks also looks for it by itself every ten minutes, 48 times at most.
Only the proof of ownership is required. PAFworks never refuses mail because another record is missing. But without the MX record, your domain’s mail does not reach PAFworks; and without SPF, DKIM and DMARC, the servers receiving your messages cannot tell that they really come from you.
Give everyone an address
A colleague uses Mail once they hold an address on one of your verified domains.
-
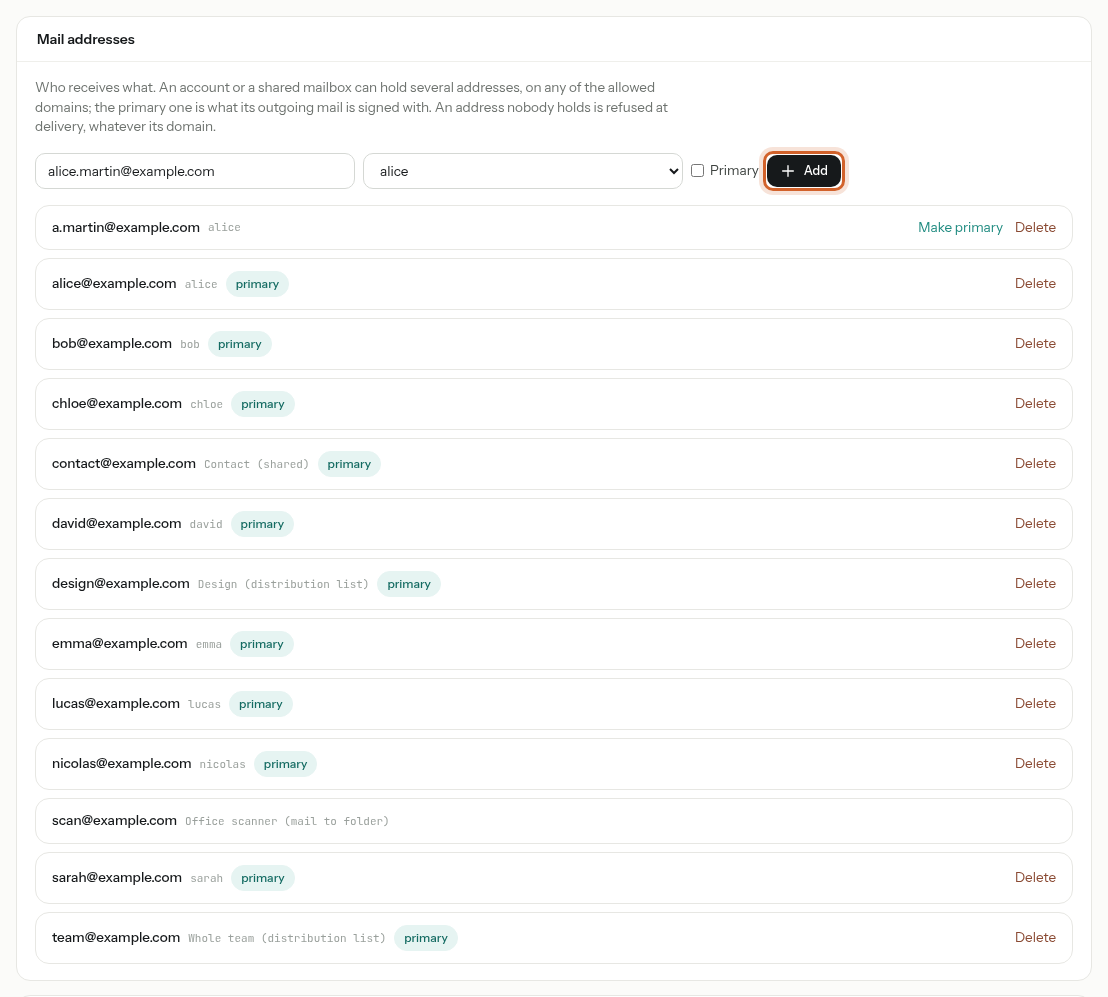
In Admin, click Mailboxes. Under Mail addresses, type the address and choose its owner in the list: an account by its user name, a shared mailbox marked (shared) or a distribution list marked (distribution list). Tick Primary if it should be the address its owner sends from, then click Add.
-
The list shows every address of your organisation and its owner. The primary one is what its owner’s mail is sent from; Make primary changes it, Delete removes an address.
- Aliases. Any further address of an account is an alias: its mail arrives in the same inbox, and the person can choose it in From. With a rule on Received at address, they can sort it apart — see Sort your mail automatically.
- New accounts. When you create a user whose e-mail address is on one of your verified domains, that address becomes their first mail address by itself.
- The first address of an owner is always its primary one.
- Removing a person’s last address takes Mail away from them, unless they belong to a shared mailbox. Their messages are kept, and come back when they are given an address again.
Shared mailboxes
A shared mailbox is an address with its own folders, read by several colleagues at once: contact@, support@, accounting@.
-
In Admin › Mailboxes, under Shared mailboxes, type its name and its address, then click Create. The new mailbox opens, still without members.
-
Under Members, choose a colleague in Add a user…, their right, and click Add. Each member’s right can be changed in their line; Remove takes them out. Manage opens a mailbox again later, to rename it or change its address and members.
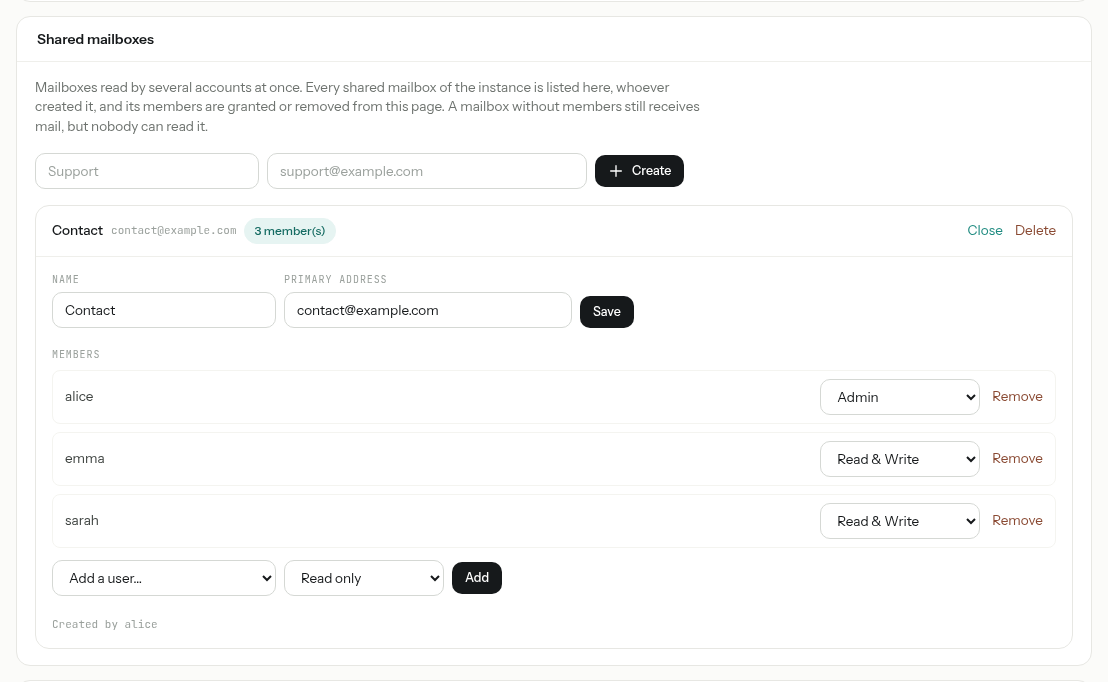
| Right | What the member can do |
|---|---|
| Read only | Read the messages. They cannot move or delete them, nor send from the mailbox’s address. |
| Read & Write | Also file and delete messages, and answer from the mailbox’s address. |
| Admin | The same as Read & Write in Mail. |
Members find the mailbox in Mail, under Team share: see Shared mailboxes in the mail guide. A mailbox without members still receives mail, but nobody can read it.
From the Mail app. Administrators also see a + next to Team share in Mail: New shared mailbox creates one with you as its Admin member.
Distribution lists
A distribution list is an address that delivers each message to the inbox of several colleagues — sales@, team@. Unlike a shared mailbox there is no common folder: every member gets their own copy, sorted by their own rules, and can answer from the list’s address so that the reply keeps reaching all of them.
-
In Admin › Mailboxes, under Distribution lists, type the name and the address of the list, then click Create.
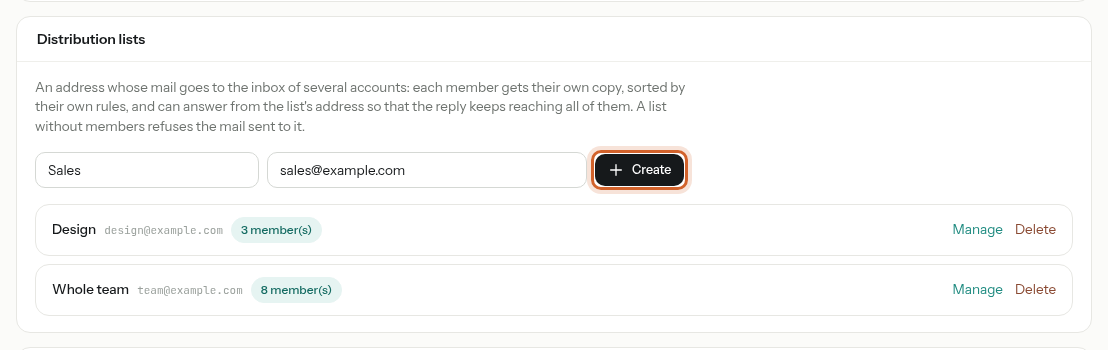
If the address already belongs to a colleague, PAFworks offers to Move it to the list: they become a member and keep receiving its mail.
-
The list opens: add its members with Add a user… and Add.
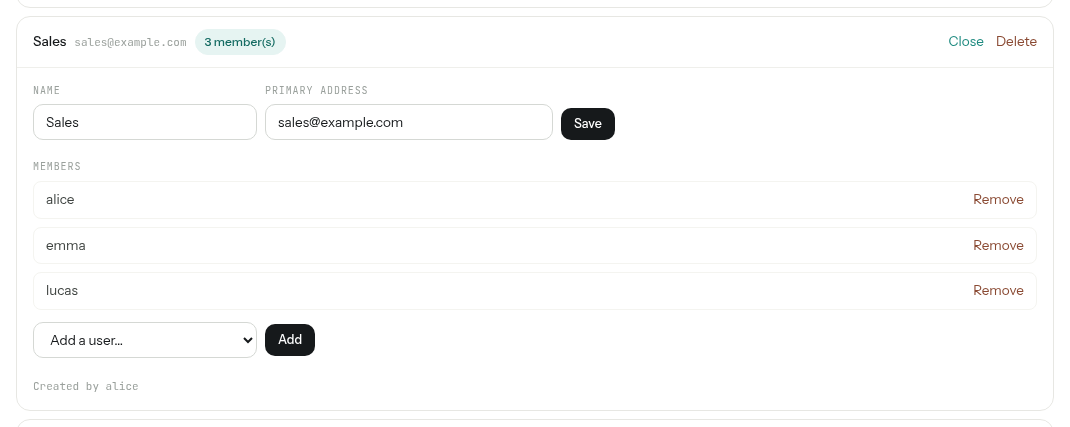
- To answer as the list, members choose its address in From.
- Members are accounts of your organisation: a list does not forward mail to outside addresses. A paused account, marked inactive, receives nothing from the list until it is resumed.
- A list without members refuses the mail sent to it. Deleting a list refuses its addresses from then on; the copies its members already received stay in their mailboxes.
Scan to a folder
A Mail to folder address files the attachments of every message it receives into a folder of Files: the address to give the scan-to-mail function of a copier.
-
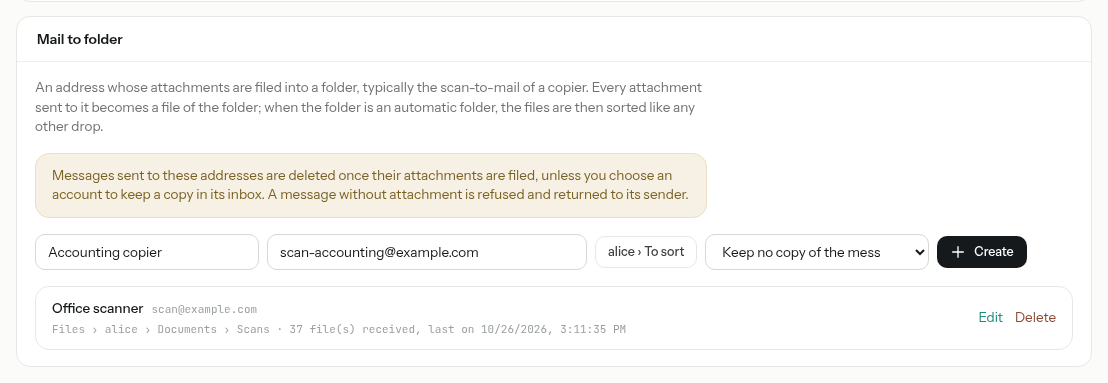
In Admin › Mailboxes, under Mail to folder, type a name and the address. Click Choose a folder…, open the folder — any shared folder, or the files of any account — and click Choose this folder.
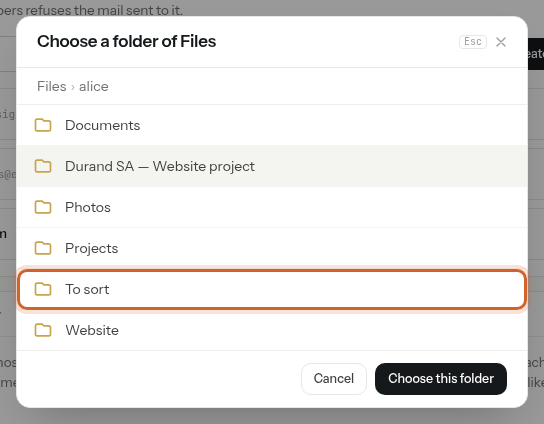
-
In the last list, choose Keep no copy of the message, or keep a copy in the inbox of an account or of a shared mailbox. Click Create.
-
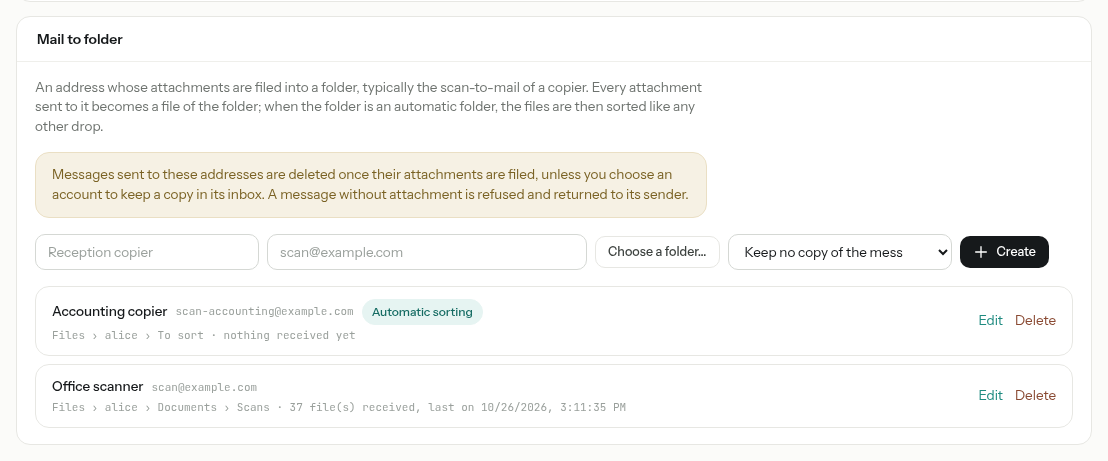
Set the copier to send its scans to the new address. Each address shows its folder and how many files it has received.
- Every attachment becomes a file of the folder. A file with the same name is never replaced: the new one gets a name of its own.
- The message itself is deleted once its attachments are filed, unless you chose to keep a copy. A message without attachment is refused and returned to its sender.
- When the folder is an automatic folder, the address shows Automatic sorting: the scans are then renamed and filed like anything dropped there — see File your documents automatically.
- Edit changes the name, the address, the folder or the copy; Delete stops the address, and the files already filed stay where they are.
Spam filter
When your PAFworks service runs the spam filter, it reads every incoming message: obvious spam is refused at the door — the sending server tells its own user — and doubtful messages go to the Junk folder of each recipient, whatever their rules. It learns from what your colleagues mark as Spam or Not spam, for your organisation alone (see Junk mail).
Its state is in Admin › Mail and meetings, under Antispam: whether incoming mail is scanned, whether the filter learns, and after how many days the junk folders are emptied, with a Test connection button. There is nothing to set there: the filter is configured by whoever runs your PAFworks service.
Good to know
- A domain belongs to one organisation: once verified, no other PAFworks organisation can add it. It stays verified even if you remove the proof record later.
- A domain that still holds addresses cannot be deleted: delete its addresses first.
- If your organisation sends its mail through a relay of its own, the domain panel says so and does not list SPF and DKIM: publish the records your relay’s provider documents.
- An address belongs to one owner only, and the part before the
@is limited to 64 characters. Mail sent to an address nobody holds is refused. - A shared mailbox or a distribution list always keeps one address: give it another one before deleting its last.
- Deleting a shared mailbox deletes its folders, its messages and its addresses; PAFworks asks for confirmation first.
- If the spam filter cannot be reached, mail is delivered unfiltered rather than held.